Introduction
ORM tools make our jobs as developers much easier. With the progression of .NET Core, Microsoft has continued down the path of extending their vast developer tool set across multiple platforms and Entity Framework is no exception.
The vast majority of documentation and examples out there today are aimed at giving you the basics of getting Entity Framework Core up and running. While a good starting point, they don't prepare you for the real world scenarios of using it in multi-project solutions.
We're going to address this issue by going more in depth into the setup and implementation of Entity Framework Core in a multi-project solution. Today we're going to explore the following:
- Keeping our entities out of our data layer
- Keeping our migrations outside of our startup project
- Supplying our connection string via configuration
- Accounting for various join types: one-to-one, one-to-many, many-to-one.
There is a lot of content to cover so buckle in, stretch those coding fingers and let's get started!
Why EF Core 2.0?
Entity Framework Core has come a long way since its inception. Standing up code first databases couldn't be easier. Data migrations are easy and effective and can be executed from the Package Manager Console in Visual Studio, or straight from the command line via the CLI. To top it off, the fluent syntax is fairly intuitive and makes mapping different relationships pretty simple without requiring navigation properties on all of your entities to make the magic happen.
In this demonstration, we're going to stand up an EF project that uses SQL Server LocalDb. I'll demonstrate one-to-one, one-to-many and many-to-many relationships as well as creating, running and scripting migrations. We'll use the CLI from the command line to execute our commands as it's the most cross platform example. The commands we'll use can be used from the windows command prompt and the same commands will work in the terminal window if you're using JetBrains Rider on a Mac for instance.
Our Data
We're going to create a simple data model for managing sports teams. We need to keep track of Teams. Each team will have one Mascot. Multiple Players will belong to the team. The team will consist of multiple playing positions with multiple players able to belong to each position.
Given the design above, we consider that each team will have one mascot and each mascot belongs to only one team. This gives us a one-to-one relationship between Teams and Mascots. Each team will have multiple players, but each player only belongs to a single team. This gives us a one-to-many relationship between Team and Player. Each player could play multiple positions and multiple players could play the same position. This gives us a many-to-many relationship between Player and Position.
Now that we have an understanding of our data, we can start building out our solution. We'll start by defining models to match our data, then generate migrations to build and update our database.
Setting up the Environment
We need to start by making sure we have the necessary components to do our development. I'll be building out my solution using Visual Studio 2017 (version 15.4.1). You can download the Professional equivalent Community Edition for free, so long as you meet the licensing requirements, but the same can be accomplished using VS Code or JetBrains Rider. Use the IDE you're most comfortable with.
Once you've chosen your IDE, the first thing you'll need to do is make sure you've installed the .NET Core 2.0 SDK for your OS. We will be using LocalDb for these examples, but if you're on Linux or Mac you won't be able to use it. The setup itself is a bit outside the scope of this post, but the easiest solution is to install Docker and setup the microsoft/mssql-server-linux image. Follow the instructions on the SQL Server for Linux page carefully and you'll end up with a running server image with a port forward that allows you to connect to it from your host OS. Substitute your connection string for the (localDb) connection string in the upcoming examples.
Setting up the Solution
We're going to start by setting up a multi-project solution. While it requires a few more steps than a simple demonstration and won't necessarily follow all best practices, it provides you with a more real world type scenario. In practice, your APIs, data layer and business logic probably won't (or at least shouldn't!) be in the same project.
This setup assumes Visual Studio. Please adjust to your chosen IDE. To start, let's setup an empty solution to house our projects. File -> New Project -> Other Project Types -> Visual Studio Solutions -> Blank Solution. Let's call it TeamSample. Now let's add some projects to our solution.
Creating the Entities
We'll start by creating our Entites. In Solution Explorer, right click the solution node, choose Add and "New Project". Choose .NET Core -> Class Library (.NET Core). Technically, if all we're going to have is classes in this project that define our entities, we could go with .NET Standard. That way our entity assembly would be easily usable by both .NET Core and full framework projects. We would want to choose NetStandard 1.3 at a minimum as we'll be making a bit of use of the data annotations in System.ComponentModel. For this example though, everything is .NET Core so we'll stick with it to be consistent. Call this new project TeamSample.Entities.
Now let's create some data classes. As we stated above, our app will consist of Teams, Mascots, Positions and Players. Each Team will have one Mascot and each Mascot will belong to a single Team. Each Team will have multiple Players. Each Player will belong to only one Team. Each Player will be assigned potentially multiple Positions with each Position potentially having more than one player.
Thinking through the scenario above, we know most relationships are pretty standard. The two that take a bit more effort are Team <--> Mascot so we can enforce a 1:1 relationship, and Player <--> Position which have a many-to-many relationship. For the latter item, we will use a join entity, PlayerPosition, to map them.
Our data models would look something like the following code sample:
using System.Collections.Generic;
using System.ComponentModel.DataAnnotations;

namespace TeamSample.Entities
{
    public class Team
    {
        public int Id { get; set; }
        [Required, MaxLength(75)]
        public string Name { get; set; }

        public Mascot Mascot { get; set; }
    }

    public class Mascot
    {
        public int Id { get; set; }
        [Required, MaxLength(75)]
        public string Name { get; set; }

        public int TeamId { get; set; }
        public Team Team { get; set; }
    }


    public class Player
    {
        public int Id { get; set; }
        [Required, MaxLength(75)]
        public string Name { get; set; }
        public int Age { get; set; }

        public int TeamId { get; set; }
        public Team Team { get; set; }

        public ICollection<PlayerPosition> PlayerPositions { get; set; }
    }

    public class Position
    {
        public int Id { get; set; }
        [Required, MaxLength(25)]
        public string Name { get; set; }

        public ICollection<PlayerPosition> PlayerPositions { get; set; }
    }

    public class PlayerPosition
    {
        public int PlayerId { get; set; }
        public Player Player { get; set; }

        public int PositionId { get; set; }
        public Position Position { get; set; }
    }
}
For demonstration convenience I have placed all of the entities in a single file, but ideally you would place them in separate files. Also note that you may want to have a property common to several or all entities, such as an IsDeleted property if you want to handle soft deletes. You can create a SoftDeleteEntityBase abstract class with the IsDeleted property and inherit from it for each entity you wish to get the property. EF Core will properly add the IsDeleted column to each of your entity tables.
Take note of the attributes used on a few of the properties above. We've added some Required and MaxLength attributes to some of our properties to make sure our string fields are not nullable and that they have a property length applied.
Creating the Data Layer
With the entities in place, we can move on to creating our data layer to leverage them. Go ahead and add another .NET Core class library project to your solution. Let's call this one TeamSample.Data. We're going to want to add some packages to this project to support Entity Framework Core. We're also gong to store our migrations in our TeamSample.Data project. In practice, you'd probably want to store your migrations separately because they will be specific to the target you choose. In this demonstration, I only care about Microsoft SQL Server so I don't have an issue with referencing the SQL Server package from my .Data project.
We're going to need packages to support Entity Framework Core, the Powershell tools, and the CLI as well as SQL Server for the migrations, so add the following NuGet packages to your TeamSample.Data project:
- Microsoft.EntityFrameworkCore (2.0.0)
- Microsoft.EntityFrameworkCore.SqlServer (2.0.0)
- Microsoft.EntityFrameworkCore.Tools (2.0.0)
- Microsoft.EntityFrameworkCore.Tools.DotNet (2.0.0)
Also add a reference to your TeamSample.Entities project so we can use the entity classes we created to build out or context. With all of the packages added, we have one more step we need to make to enable the CLI tools so we can use `dotnet ef`from the command line.
Edit the TeamSample.Data.csproj file. In Visual Studio 2017 you can just right click the project file and choose edit. You'll see an ItemGroup that contains your EntityFramework NuGet packages. You'll need to add a DotNetCliToolReference element to enable the CLI tools. Your updated project group should look as follows:
<ItemGroup>
    <PackageReference Include="Microsoft.EntityFrameworkCore" Version="2.0.0" />
    <PackageReference Include="Microsoft.EntityFrameworkCore.SqlServer" Version="2.0.0" />
    <PackageReference Include="Microsoft.EntityFrameworkCore.Tools" Version="2.0.0" />
    <PackageReference Include="Microsoft.EntityFrameworkCore.Tools.DotNet" Version="2.0.0" />
    <DotNetCliToolReference Include="Microsoft.EntityFrameworkCore.Tools.DotNet" Version="2.0.0" />
</ItemGroup>
Defining the DbContext
With the project setup, we need to create a DbContext that we will use to access our data and create some of the specific mapping for our objects. All of the repositories will be exposed as DbSet<T> collections. Entity Framework Core is smart enough to handle most of the mapping for us, but the one-to-one mapping and many-to-many mappings require an extra step to configure the relationships. Let's begin by creating the shell for our DbContext class. We'll call it TeamSampleDbContext.
using Microsoft.EntityFrameworkCore;
using TeamSample.Entities;

namespace TeamSample.Data
{
    public class TeamSampleDbContext : DbContext
    {
        public TeamSampleDbContext(DbContextOptions<TeamSampleDbContext> options) : base(options)
        { }

        protected override void OnModelCreating(ModelBuilder builder)
        {

        }
    }
}
The first thing I'd like to point out is the constructor that takes a DbContextOptions<TeamSampleDbContext> and passes those options to the base. This constructor will be necessary when we setup our DbContext for dependency injection later. It provides a constructor for the DI Container to pass in options which will include the connection string that we'll be storing in a separate settings file.
Now we need a way to access our entities. Add a DbSet<T> property for each entity to the TeamSampleDbContext class.
public DbSet<Team> Teams { get; set; }
public DbSet<Mascot> Mascots { get; set; }
public DbSet<Player> Players { get; set; }
public DbSet<PlayerPosition> PlayerPositions { get; set; }
public DbSet<Position> Positions { get; set; }
Our entity repositories are now almost ready to use. Through the use of Id's and Navigation properties, Entity Framework is able to determine every relationship in our data set. There are a couple of entities that need a small bit of extra configuration. Remember that there is a one-to-one relationship between a Team and a Mascot. The Team entity has a navigation property for Mascot and the Mascot entity has a navigation property for Team as well as a TeamId. By default this would generate a database table that supports a one-to-many relationship. We need to instruct Entity Framework to define a unique constraint for TeamId.
If you look again at our TeamSampleDbContext class, you'll see that we have overridden the OnModelCreating method which takes a ModelBuilder as a parameter. We'll use this builder to specify some additional metadata for how the entity relationships should be constructed. In this case, we're going to specify that the Team entity has one Mascot entity, with one Team entity and the foreign key will be Mascot.TeamId. So let's update our OnModelCreating as follows:
protected override void OnModelCreating(ModelBuilder builder)
{
    builder.Entity<Team>()
        .HasOne(t => t.Mascot)
        .WithOne(m => m.Team)
        .HasForeignKey<Mascot>(m => m.TeamId);

}
We also need to take a look at the relationship between Player and Position. Rember, we can have multiple players in a single position, and each player can play multiple positions. We've created a join entity called PlayerPosition. The PlayerPosition join entity references both Player and Position via navigation properties and contains an Id for each. This is sufficient for Entity Framework to determine the foreign key relationships and allows for many-to-many mapping between Player and Position, but there's a problem. Since PlayerPosition has no Id property, creating our migration will fail as Entity Framework can't determine the primary key for the table.
We could easily remedy this by adding an int Id property to our PlayerPosition entity. However, this creates a small wrinkle. This would allow a given player to be assigned to the same position more than once. We don't want that to occur. Instead, we're going to return to our OnModelCreating method and instruct Entity Framework to create a compound key using the PlayerId and PositionId properties. This will ensure that the same combination of player and position cannot be created more than once.
Fortunately, this can be accomplished by adding a single line to our OnModelCreating method. We're going to leverage the HasKey method of the fluent API to specify the compound key. This can be accomplished as follows:
builder.Entity<PlayerPosition>().HasKey(p => new { p.PlayerId, p.PositionId });
That's all there is to it. Our entities have been created, our relationships have been defined and our context is ready to be consumed, but we want to create snapshots so we can script our database changes. We'll do so by using migrations.
Preparing for Migrations
There are different ways we can get setup and ready for migrations. For example, we could setup a console application project, or define a class library project with a Startup class. We can specify a Configuration class to use to seed our database. We can specify what DbContext to use (in the event we have multiple DbContext objects). I want to show this in the context of living alongside an API, we we're going to use a WebApi project.
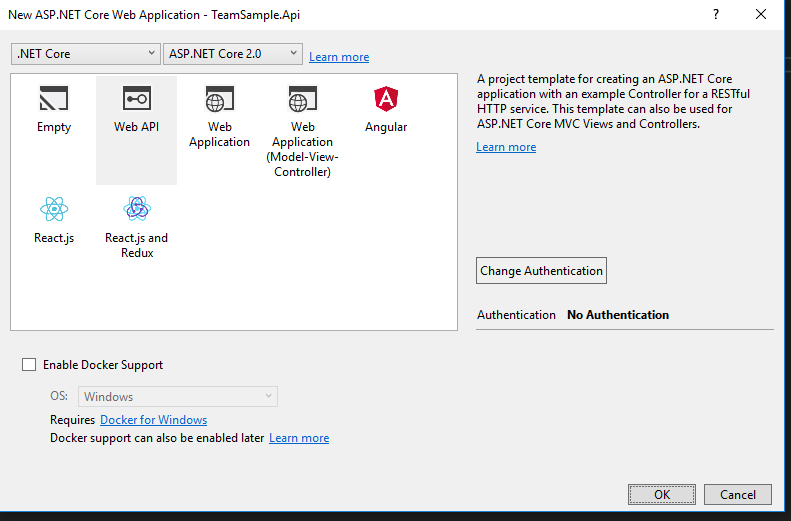
Add a new project to your solution. Choose the Visual C# -> Web -> ASP.NET Core Web Application Project template (if you're using Visual Studio). Name this project TeamSample.Api. In the next options dialog, choose Web API. Leave .NET Core and ASP .NET Core 2.0 selected in the drop down menus. For this example, make sure "Enable Docker Support" is unchecked and leave authentication at "No Authentication".
This will scaffold a new ASP .NET Core Web API application for us. If using Visual Studio, you can right click this project in the Solution Explorer window and "Set as startup project". If you choose to run the Powershell based commands (such as Add-Migration) from the package manager console, it will use this startup project to resolve the database system and targets being used.
Let's start by adding a connection string that we will configure for use. In the new Web API project, open the appSettings.json file. Add your connection string setting above or below the "Logging" configuration object. For this example, we're using MSSQL LocalDb, but feel free to substitute for SQL Express or another standalone SQL Instance. If you're using Mac or Linux, remember to check out the SQL Server 2017 for Linux Docker setup that I referenced at the beginning of this post. Your configuration should now look something like the following:
{
    "Logging": {
        "IncludeScopes": false,
        "Debug": {
            "LogLevel": {
                "Default": "Warning"
            }
        },
        "Console": {
            "LogLevel": {
                "Default": "Warning"
            }
        }
    },
    "ConnectionStrings": {
        "TeamSample": "Server=(localdb)\\MSSQLLocalDB;Initial Catalog=TeamSample;Integrated Security=true;"
    }
}
We've added our ConnectionStrings element, and to it added a connection string called "TeamSample". The next step is to reference this connection string and register our DbContext with the services collection. We'll do this in the Startup.cs class of our new Web API project. Open Startup.cs and navigate to the ConfigureServices method. You'll probably see a single line here, services.AddMvc();. What we want to do is register the DbContext with the services collection. You could interface it and handle it manually, but we're going to use the built in extensions so we can provide the connection string.
First, add a project reference to your TeamSample.Data project. The extension methods we'll be using come from other packages such as Microsoft.EntityFrameworkCore. We shouldn't need to add references to these as Visual Studio 2017 will reference them implicitly through the TeamSample.Data project. If for some reason your IDE cannot resolve them, add the appropriate Microsoft.EntityFrameworkCore packages from NuGet to your TeamSample.Api project.
Return to your Startup.cs class and the ConfigureServices method. Right above services.UseMvc() add the following two lines:
var connectionString = Configuration.GetConnectionString("TeamSample");
services.AddDbContext<TeamSampleDbContext>(_ => _.UseSqlServer(connectionString));
These lines are pretty self explanatory. The first loads the connection string that we added to the appsettings.json file while the second registers our TeamSampleDbContext in the services collection and passes to it an action which will build the db context options. The UseSqlServer method builds Sql Server context options with the connection string we specified. These options will be supplied to the TeamSampleDbContext when it is constructed. Note that you can also control the lifetime of the DbContext and and Options with this particular overload. The default values are Scoped which will construct one context per request.
That should take care of the configuration necessary to begin creating and applying our migrations. Now it's time to dive into the CLI.
Creating the First Migration
We've created our entities, created our database context, configured our connection string and our startup and now we're ready to create our first migration. Migrations are interesting because they are C# classes that define the shape of the changes to our database. Each migration will have an Up and a Down method; the first describing the changes necessary to apply the migration and the second describing the changes necessary to revert the migration.
They are not fully target agnostic however. For instance, when targeting Microsoft SQL Server, there will be some SQL Server specific code added to the migrations, such as specifying columns that should be auto generated. This is why we included the Microsoft.EntityFrameworkCore.SqlServer package in our TeamSample.Data project. Since we will be storing our migrations in that project along with the context, we needed it to be able to resolve those types.
While you can work with migrations using the Package Manager Console in Visual Studio, we're going to demonstrate the operations from the command line using the CLI. This makes our examples cross-platform and cross-IDE friendly since the same commands will apply in other environments. As an example, rather than using the Windows Command Prompt, you can use the excellent Terminal window in JetBrains Rider. If you're interested in using a terminal-esque command line window inside of Visual Studio, you can try the Whack Whack terminal add-in by Daniel Griffen, the source of which is also on GitHub. It is also very good. Once installed, you can find it at View -> Other Windows -> Terminal Window.
Open a command prompt and navigate to your solution folder. For example, mine is at C:\Users\Dustin\Source\Repos\TeamSample. Now, navigate into your TeamSample.Data project folder (cd TeamSample.Data). This is important, because this is the project we installed the CLI Tools to. Let's take a brief moment to explain. I decided I wanted my migrations by default to live in this project, so I want to run my tools from this folder. This complicates things a bit because the CLI tools need to know where your startup project is (TeamSample.Api). This will result in us adding an additional command line switch (-s) to our migration commands to specify the location of our startup project. However, it also gives us the ability to change out that startup project later without having to worry about losing our migrations because they live alongside our data layer.
Once you're in the TeamSample.Data folder, issue the following command:
dotnet ef migrations add InitialMigration -s "../TeamSample.Api/TeamSample.Api.csproj"
The 'dotnet' command refers to the CLI. Everything from 'ef' on is provided to us by the CLI Tools package that we added to our TeamSample.Data project earlier in this post. 'InitialMigration' is the name of the first migration we want to add. These should be descriptive, but don't get too carried away as you may need to retype them later. The '-s' switch allows us to specify the Startup Project. This could be a console application, or anything that's capable of bootstrapping our DbContext. In our case, it's the Web API project. The command will process the Startup.cs file and generate a migration.
Now let's update our database with the new migration. Execute the following command from the same folder location we've been working on:
dotnet ef database update -s "../TeamSample.Api/TeamSample.Api.csproj"
It's not absolutely necessary for your database to already exist, as long as the user you're connecting to the database server with has permission to create a database. The migration command will create the database for you if it doesn't exist. However, you can also have an empty database stood up and waiting. The command will also add a table to store the migration history which keeps track of which migrations were already applied to your database. Any future executions of 'ef database update' will only apply the migrations that have not yet been applied. If all goes well, you should have seen output like the following:

Scripting the Migration
Now that we've created our initial migration, we may want to generate a SQL Script from that migration. This would allow us to execute the script on another server to keep the database changes in sync. The command to do this is also quite simple.
dotnet ef migrations script -s "../TeamSample.Api/TeamSample.Api.csproj"
This will create a full script for your migration. In fact, if you had multiple migrations, this would generate a start to finish script for your entire migration history. Since we just have a single migration, the output of this command looks like so:
IF OBJECT_ID(N'__EFMigrationsHistory') IS NULL
BEGIN
    CREATE TABLE [__EFMigrationsHistory] (
        [MigrationId] nvarchar(150) NOT NULL,
        [ProductVersion] nvarchar(32) NOT NULL,
        CONSTRAINT [PK___EFMigrationsHistory] PRIMARY KEY ([MigrationId])
    );
END;

GO

CREATE TABLE [Positions] (
    [Id] int NOT NULL IDENTITY,
    [Name] nvarchar(25) NOT NULL,
    CONSTRAINT [PK_Positions] PRIMARY KEY ([Id])
);

GO

CREATE TABLE [Teams] (
    [Id] int NOT NULL IDENTITY,
    [Name] nvarchar(75) NOT NULL,
    CONSTRAINT [PK_Teams] PRIMARY KEY ([Id])
);

GO

CREATE TABLE [Mascots] (
    [Id] int NOT NULL IDENTITY,
    [Name] nvarchar(75) NOT NULL,
    [TeamId] int NOT NULL,
    CONSTRAINT [PK_Mascots] PRIMARY KEY ([Id]),
    CONSTRAINT [FK_Mascots_Teams_TeamId] FOREIGN KEY ([TeamId]) REFERENCES [Teams] ([Id]) ON DELETE CASCADE
);

GO

CREATE TABLE [Players] (
    [Id] int NOT NULL IDENTITY,
    [Age] int NOT NULL,
    [Name] nvarchar(75) NOT NULL,
    [TeamId] int NOT NULL,
    CONSTRAINT [PK_Players] PRIMARY KEY ([Id]),
    CONSTRAINT [FK_Players_Teams_TeamId] FOREIGN KEY ([TeamId]) REFERENCES [Teams] ([Id]) ON DELETE CASCADE
);

GO

CREATE TABLE [PlayerPositions] (
    [PlayerId] int NOT NULL,
    [PositionId] int NOT NULL,
    CONSTRAINT [PK_PlayerPositions] PRIMARY KEY ([PlayerId], [PositionId]),
    CONSTRAINT [FK_PlayerPositions_Players_PlayerId] FOREIGN KEY ([PlayerId]) REFERENCES [Players] ([Id]) ON DELETE CASCADE,
    CONSTRAINT [FK_PlayerPositions_Positions_PositionId] FOREIGN KEY ([PositionId]) REFERENCES [Positions] ([Id]) ON DELETE CASCADE
);

GO

CREATE UNIQUE INDEX [IX_Mascots_TeamId] ON [Mascots] ([TeamId]);

GO

CREATE INDEX [IX_PlayerPositions_PositionId] ON [PlayerPositions] ([PositionId]);

GO

CREATE INDEX [IX_Players_TeamId] ON [Players] ([TeamId]);

GO

INSERT INTO [__EFMigrationsHistory] ([MigrationId], [ProductVersion])
VALUES (N'20171031193315_InitialMigration', N'2.0.0-rtm-26452');

GO
Examining this script, you can see that our Primary Keys, Foreign Keys and Indexes were all setup and applied correctly. For more information on scripting migrations, refer to my previous post on the subject. The commands described are geared toward package manager console users, however you can simply adjust the commands to match what we've done here.
That's all there is to it. In Part 2 of this series, we'll take a deeper look at migrations and look at seeding our database with some default data. We'll also look at tearing down and recreating our database, including applying the migrations at runtime.. Please comment below if you have questions and let me know if you've found this post helpful. You can also follow me on Twitter: @dustinhorne.